We wanted to test out the food, service, and atmosphere of a restaurant before hosting my older sister's baby shower; while waiting for our food we took advantage of the paper-covered table and mug of crayons provided.
This gaggle of girls loves art...markers, glue, paint, glitter... you name it, you might even say we're borderline obsessed! We spend many a minute creating. That being said, in this household exploring, experimenting, and discovering is essential...

Sunday, February 26, 2012
DaVinci Science Center fingerprint art (12/28/2011)
The Davinci Science Center had an exhibit on fingerprints. We got to scan our prints, observe them on the computer, and compare them to the different types of fingerprints. No two prints are alike and neither were the thumbprint pictures we made. The center provided the paper, colored pencils, and ink pads along with some thumbprint illustrations from illustrator Ed Emberley. We provided the prints and our own ideas.
Countdown Calendar- Family Visiting (1/29)
Aunt Jess and Co are coming to town so of course a countdown calendar is a must. What you need: paper, scissors, crayons, glue stick, marker
What to do: Cut out windows on paper (enough for each day of your countdown). Cut matching shapes to fit within each window. Draw pictures on the shapes and then glue them under each window flap. Each morning, cut or rip one window off until countdown ends! You can also put stickers under each flap. Kelsey used a marker to number each of her windows.
Bubble Wrap Envelope Squishy Painting (1/26)
What you need: bubble wrap envelope, paper, paint
What to do:
Squirt some paint on your paper. Slip it into a bubble wrap envelope.
Squish and smush the envelope. Pull out your paper to reveal!Healthy Breakfast (1/23)
cracking eggs
adding ingredients
blender drinks... can freeze leftovers in microwave safe dish to be lightly defrosted in microwave & blended again
Sydney and I made a "healthy" breakfast for the family.
adding ingredients
blender drinks... can freeze leftovers in microwave safe dish to be lightly defrosted in microwave & blended again
Sydney and I made a "healthy" breakfast for the family.
What you need for Smoothies: blender, milk, bananas (we use frozen so they smoothie is very cold), yogurt, strawberry frozen fruit bar, juice
What to do: add desired amount of each ingredient into blender and zizzle away!
What you need for oatmeal bake:
- 1/3 cup butter, melted
- 2 large eggs
- 3/4 cup raw sugar (or brown sugar)
- 1 1/2 teaspoons baking powder
- 1 1/2 teaspoons vanilla
- 1 teaspoon cinnamon
- 1/4 teaspoon salt
- 1 cup plus 2 Tablespoons milk
- 3 cups oats (regular or quick oats)
What to do: follow the recipe in this link Freezer Friendly Baked Oatmeal. We ate ours right away but I baked some in cupcake tins and wrapped and froze and made some in mini loaf pans. It really was delicious! I prefer it straight out of the oven, the hubby and kids like it sprinkled with brown sugar and topped with milk.
Pink, Purple, Red Collage Cards (1/22)
We got an early start on our Valentine's Day cards for our friends. I folded paper in half and drew a half heart shape. Kelsey cut on the lines, opened the paper, and revealed a full heart (lesson on symmetry). Sydney needed assistance. I then set out all the collage materials that we had that were pink, red, and purple. What you need: paper, scissors, dishes of glue, paint brushes, collage materials
Instead of signing all 15 cards, each, the girls stuck a personalized name tag sticker on the back of each valentine. Booklets of personalized name tag stickers can be found at The Christmas Tree Shops for less than $2.
Instead of signing all 15 cards, each, the girls stuck a personalized name tag sticker on the back of each valentine. Booklets of personalized name tag stickers can be found at The Christmas Tree Shops for less than $2.
Melted Valentines (1/21)
What to do: Line a baking sheet with foil. Place cookie cutters on the sheet. Put pony beads in the cookie cutters, making them at least 2 layers. Bake at 375degrees for 25 minutes. Make sure the room is well ventilated. Remove from the oven and allow to cool. Pop out of cookie cutters. The top edges were sharp so we filed them down.
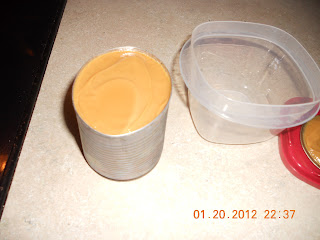
Homemade Caramel (1/20)
*FOR ADULTS ONLY!!! What you need: a can of sweetened condensed milk, large pot, stove, water, can opener
What to do:
Fill a large pot of water, almost to the top. Remove the label from
the can of milk. Place the can in the water. Boil for 2 and a half
hours. Periodically check the water level; if it gets low, refill with
water. The can needs to be fully submerged during this process! Let
cool for a couple of hours. Use a can opener to open can.
Abracadabra...the creamiest homemade caramel...mmm!!!
Subscribe to:
Posts (Atom)


